


1. What are Custom Fields?
Custom fields are user-defined data slots that help collect and store specific details from your chatbot interactions.
This is what the structure of the custom field inside the platform looks like,
{{custom_field_name}}
2. Creating Custom Fields
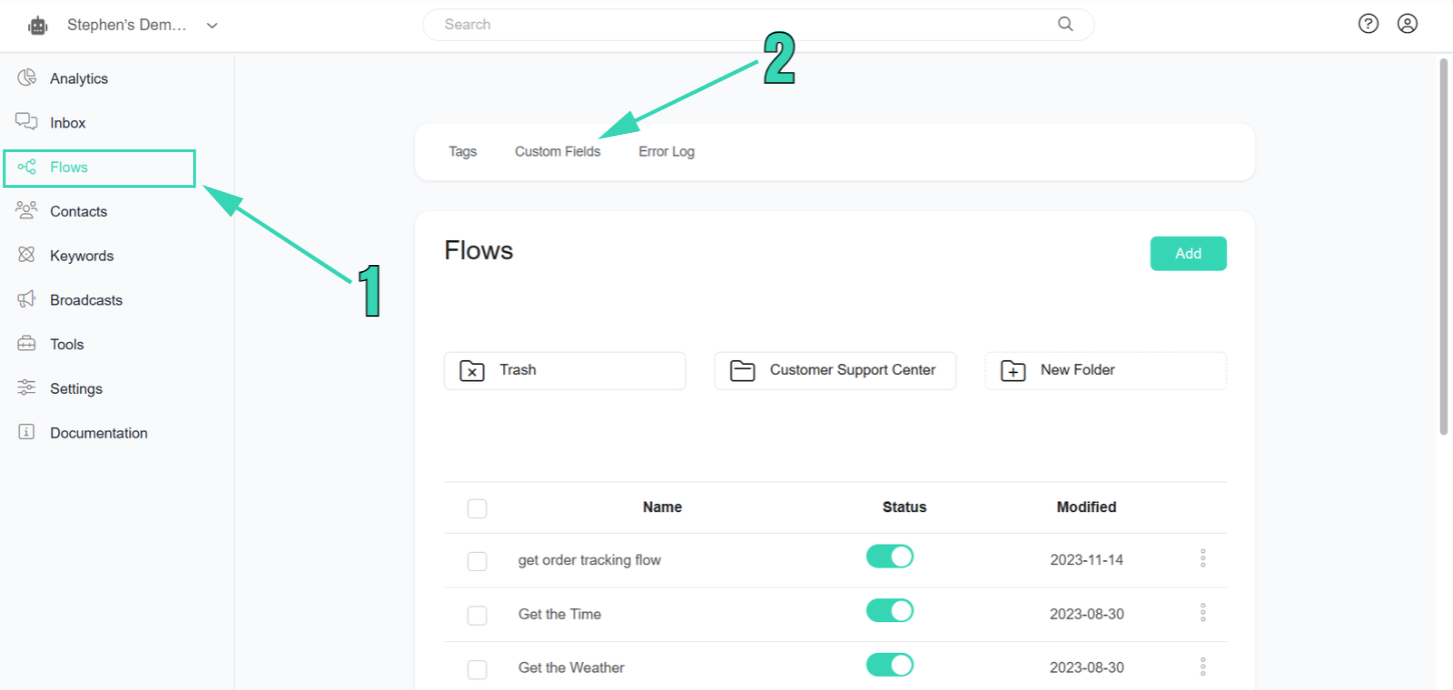
a. Log in to your account
b. Click on Flows
c. Find and click on Custom Field
d. Click on Add
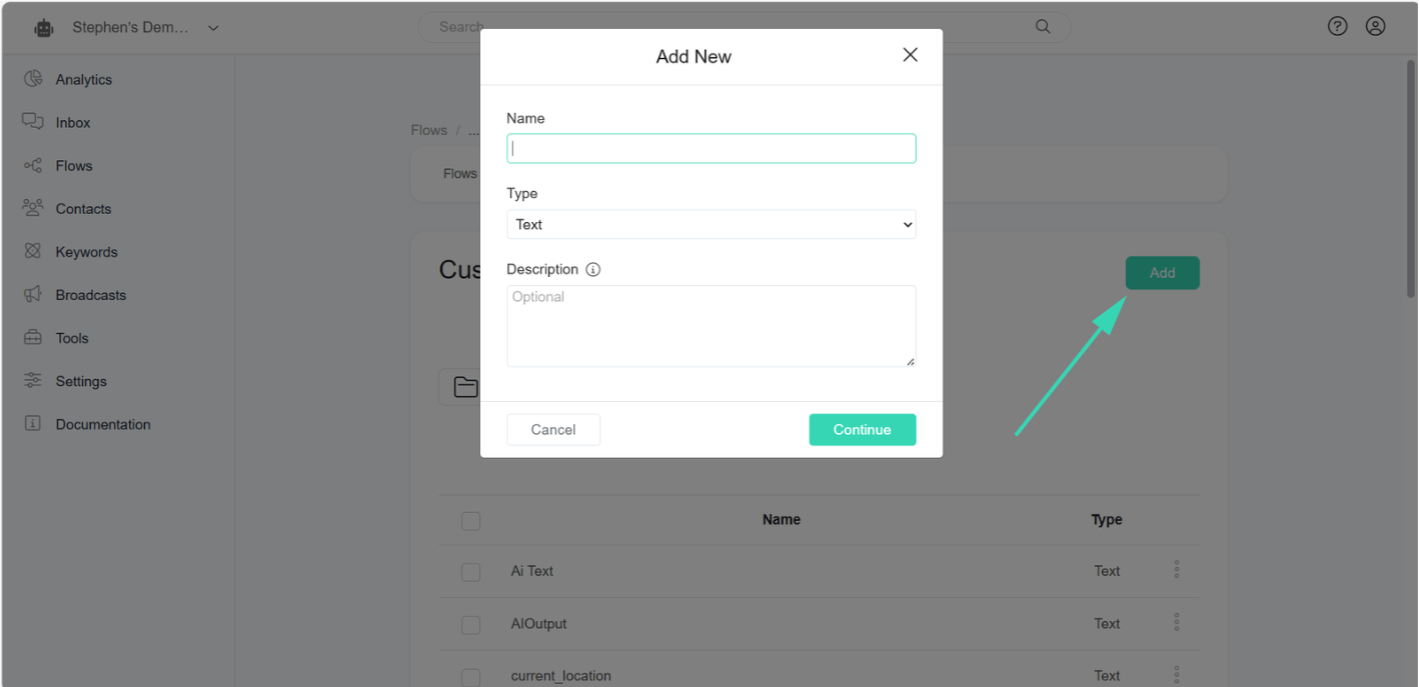
e. Define the field Name, Type, and add a Description that best fits your custom field function.

f. Continue to save the custom field.
3. Using Custom Field on the Chat Flow
If you already created the custom field to save the user input (information), it’s fine. However, there is another way you also can create a custom field while building the chat flow.
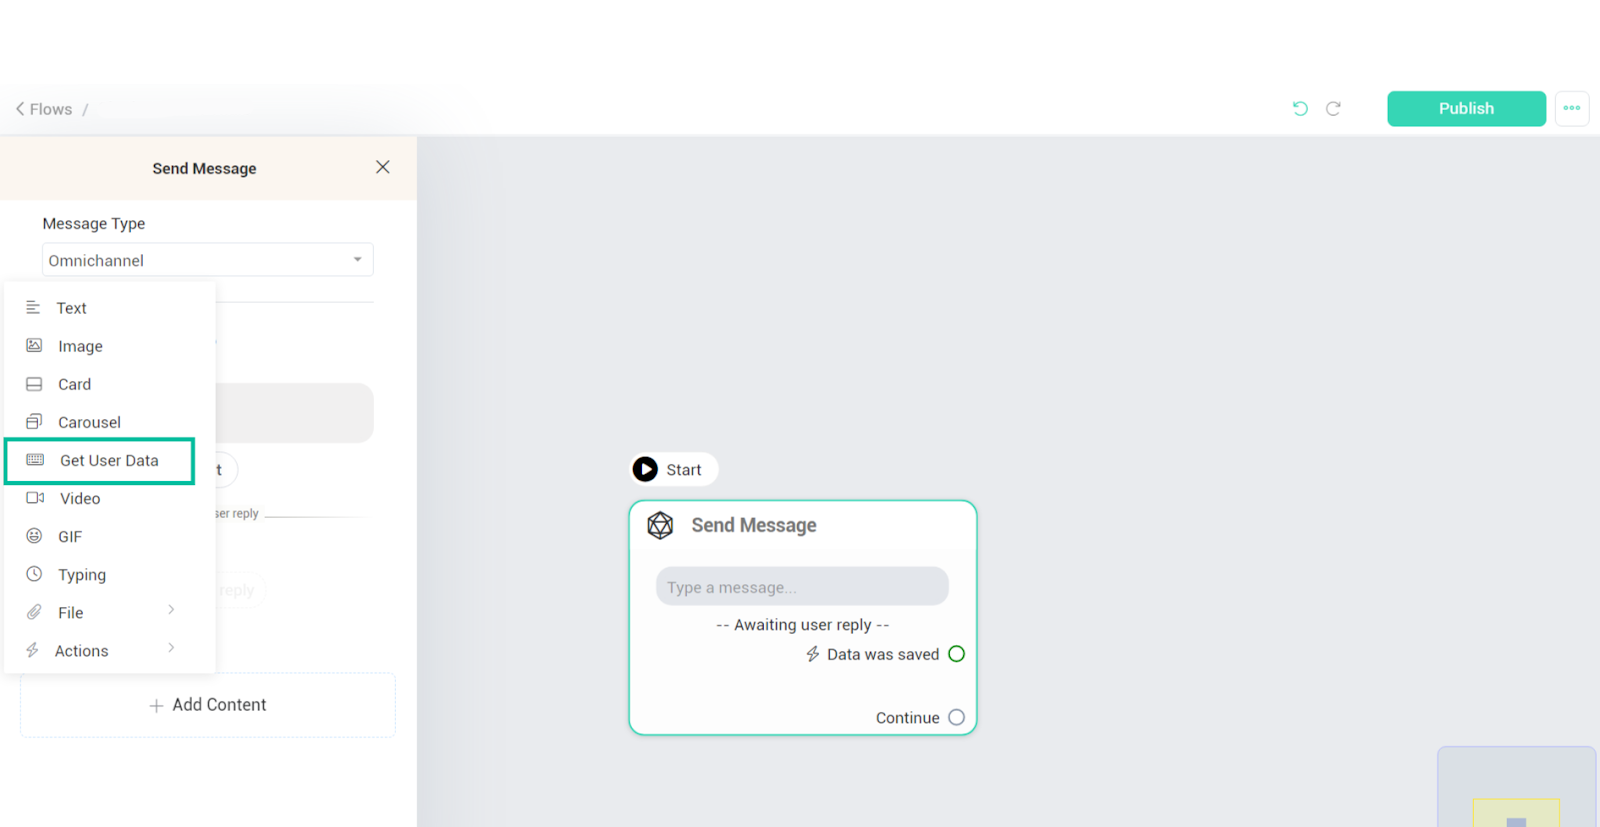
a. Select the flow where you want to use this custom field feature.
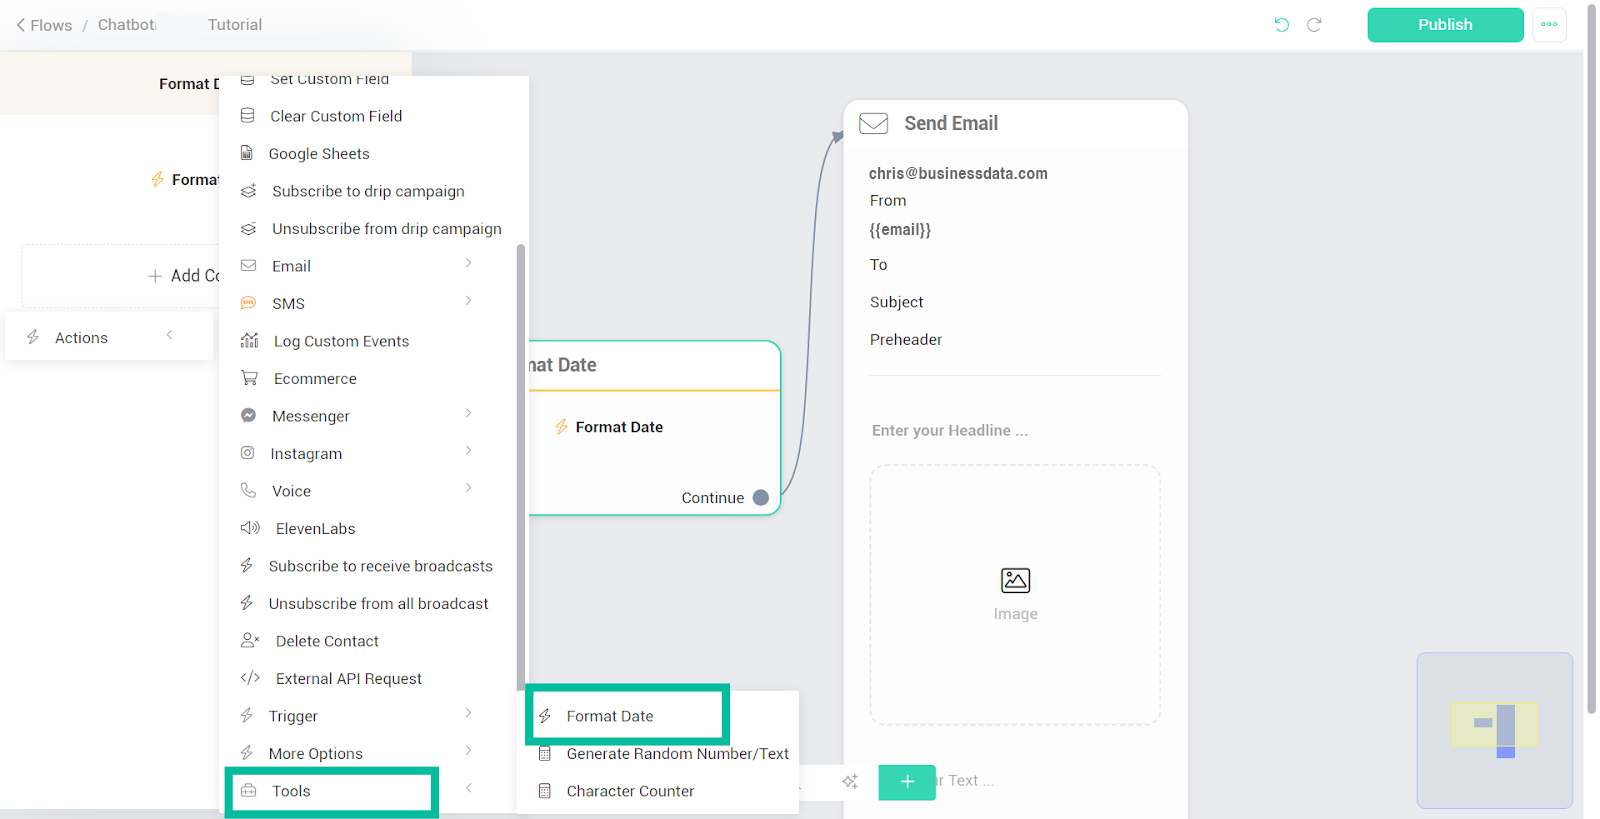
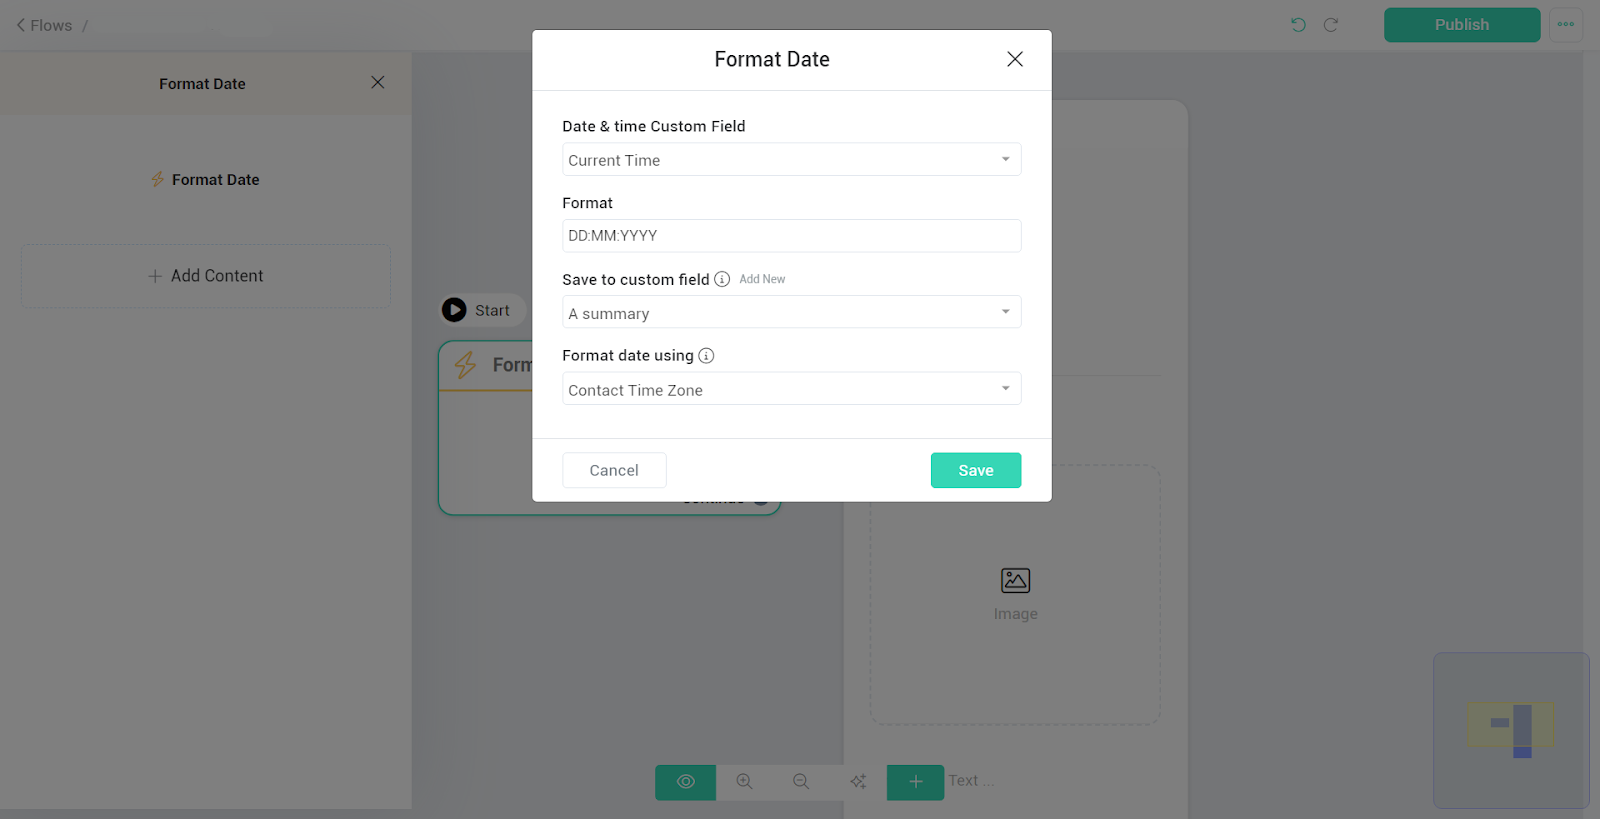
On the flow, utilise “Get User Data” to gather input from your subscribers (similar to the image below).
b. Then click on the “Edit” button to configure the custom field.
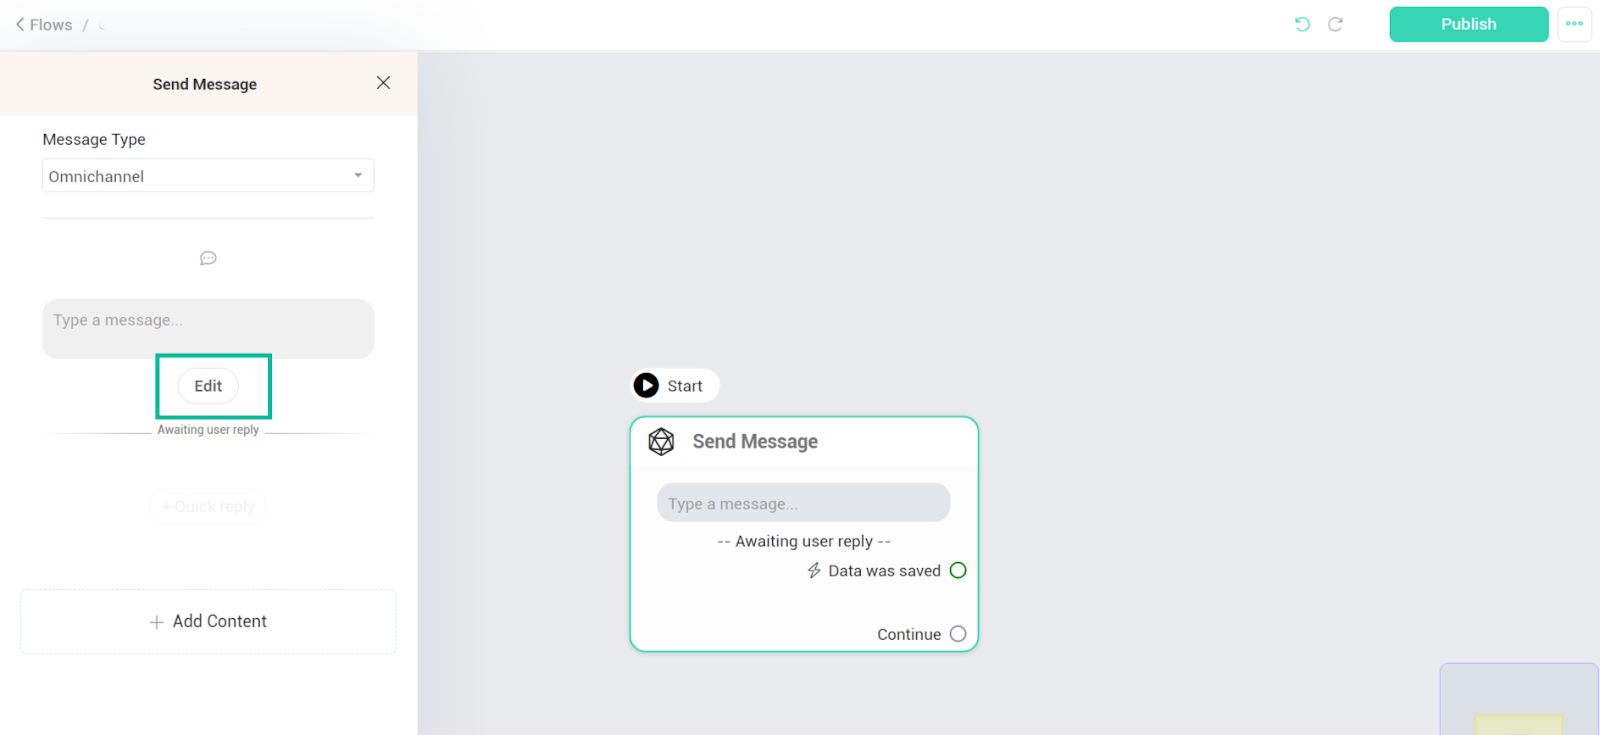
c. Now, choose the custom field if you have created it already or you can create a new custom field here in the wizard itself.
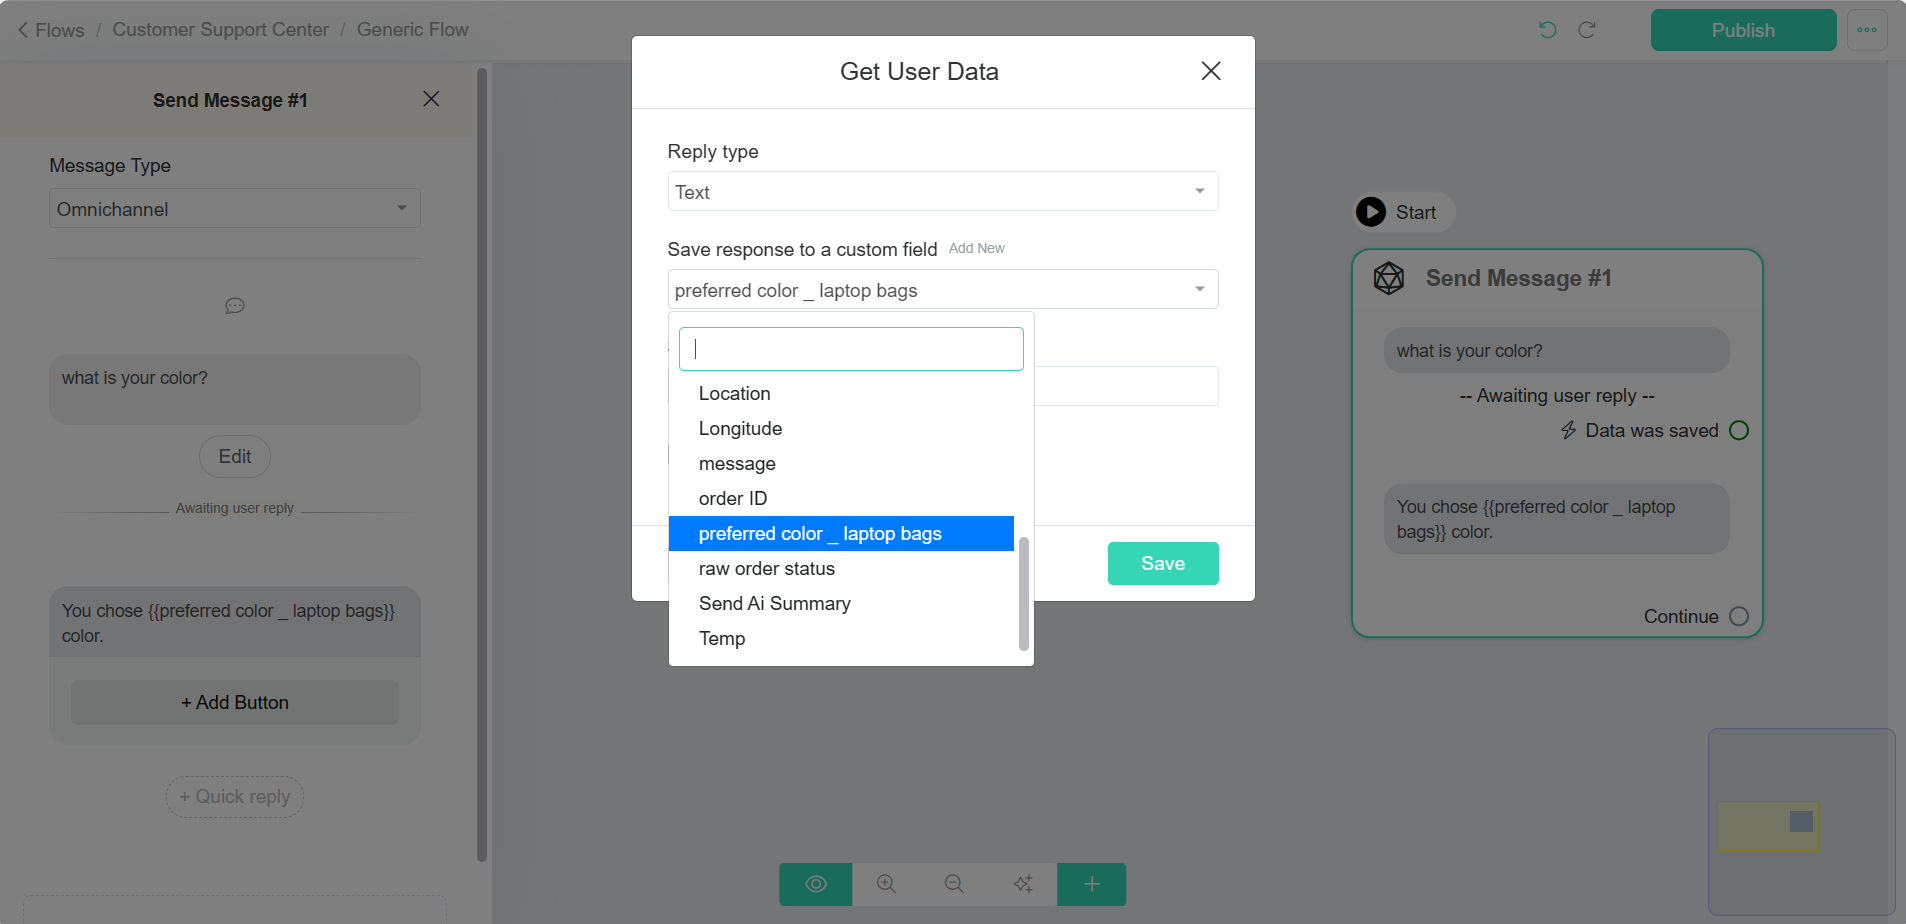
When any subscriber on this flow provides the input on this user input, it will get stored on the custom field named “preferred color _ laptop bags”.
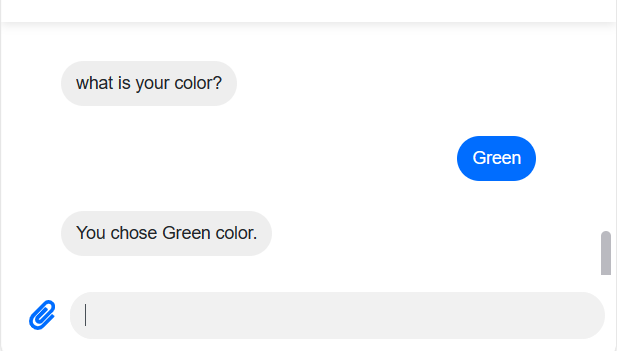
This is how it will reflect on your subscribers.
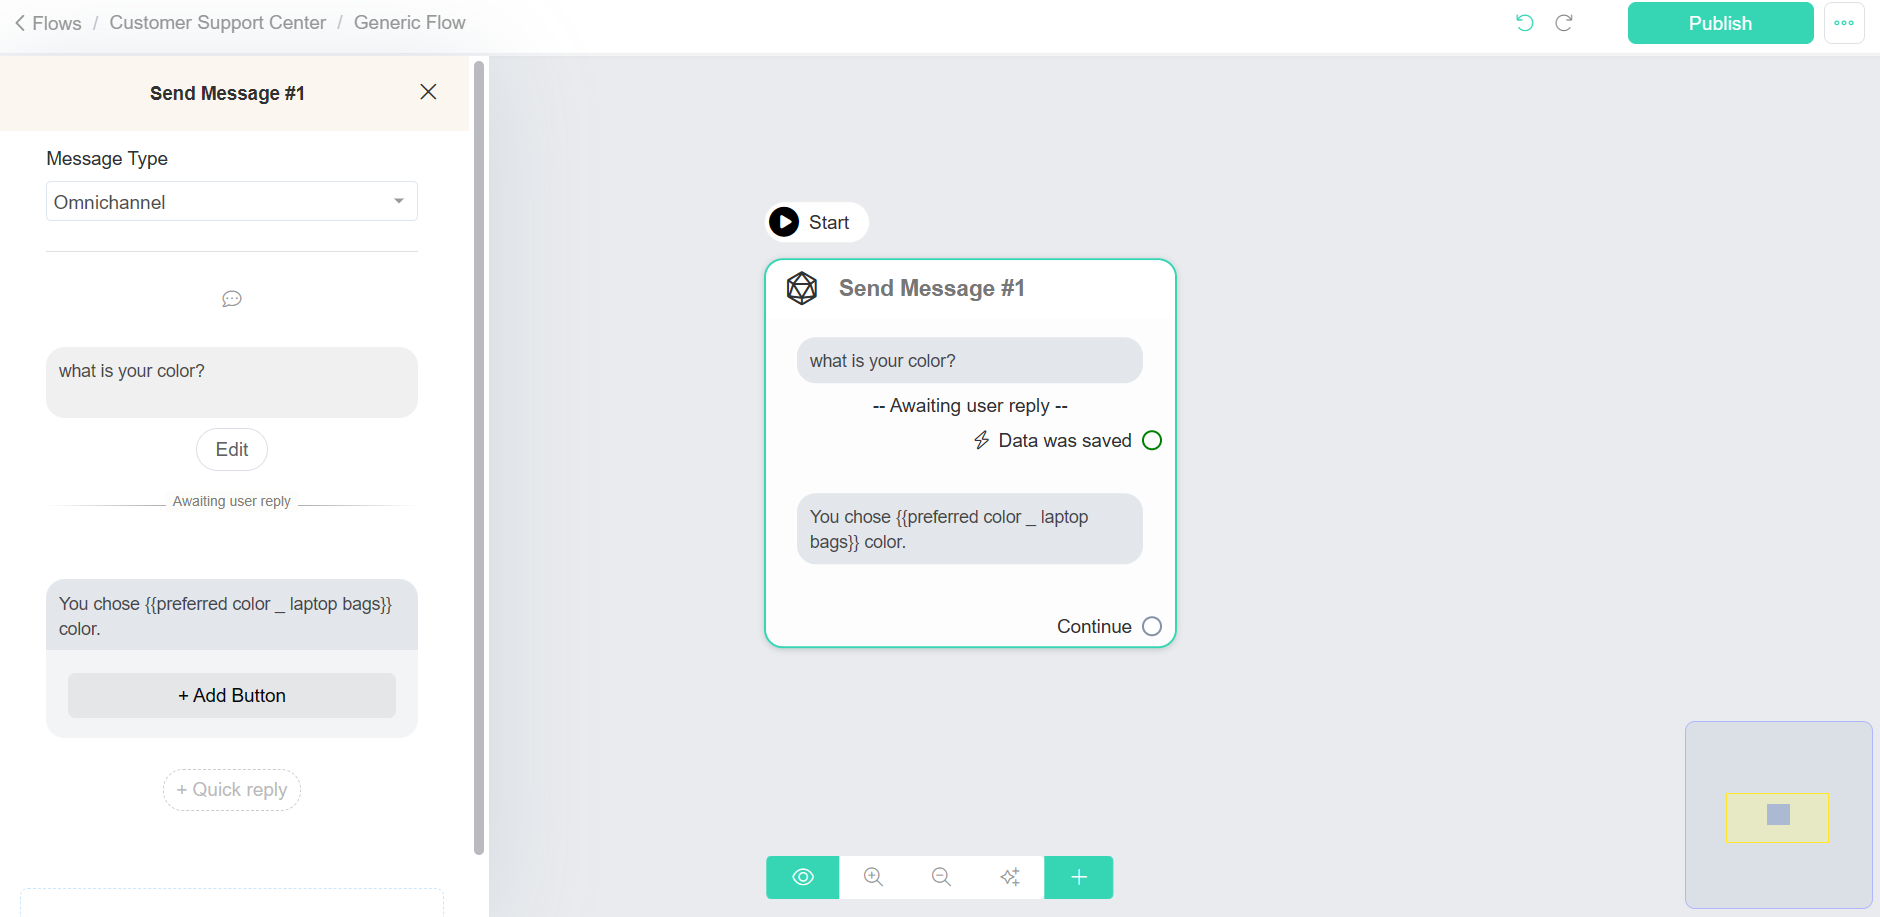
This is how the chat flow is constructed.
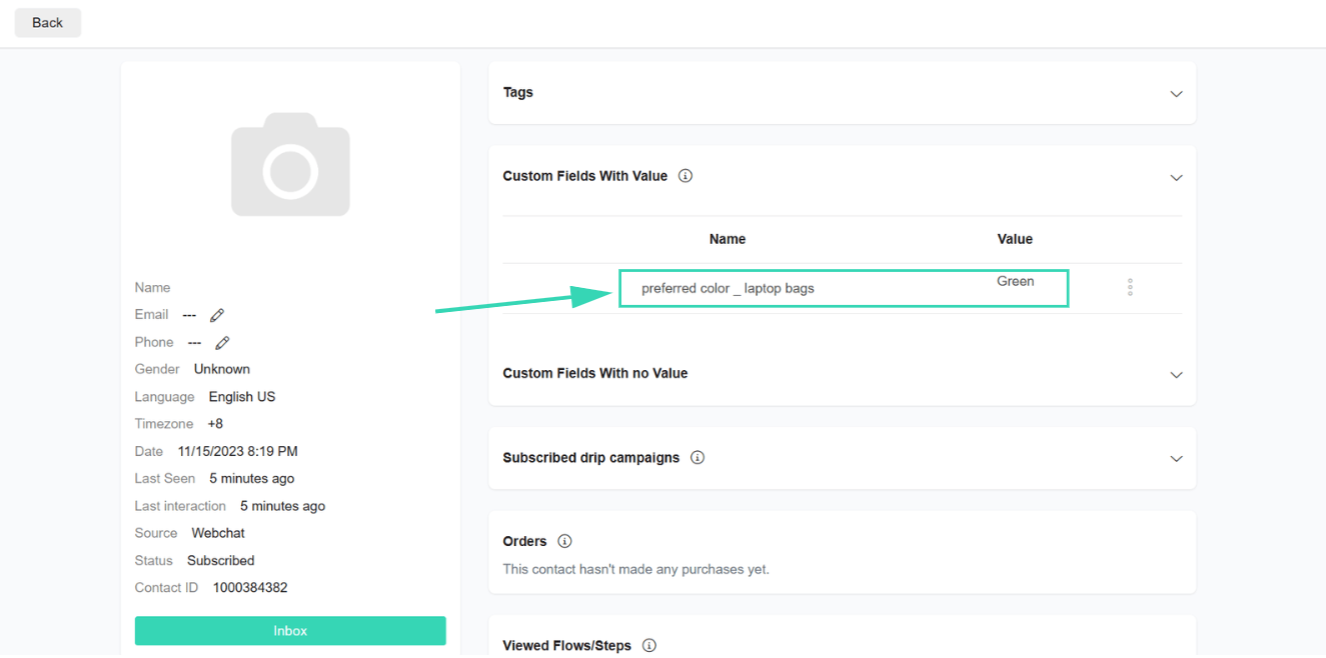
And this user input will be stored on the respective custom field as we said before. You can see the custom field information on the individual audience details.
You can see the Green colour which the user gave was stored on the respective custom field.
4. Practical Use Cases:
Custom fields on platforms offer immense value for personalisation, enabling you to customise your messages and interactions for individual users, resulting in a more engaging and relevant experience. Here are three practical examples of how you can leverage custom fields for personalisation:
a. Personalised Greetings:
Custom fields can be employed to address users by their names, adding a friendly and personalised touch to interactions. Here’s an example flow for greeting a user by name:
– When a client subscribes to your chatbot or provides their name, store their name in a custom field e.g., {{first_name}}
– Create a welcome message that includes their name: “Hi {{first_name}}, welcome to our chatbot! How can we assist you today?”
– Whenever you need to address the user during the conversation, use {{first_name}} to insert their name
This simple personalisation technique can make users feel more valued and engaged with.
b. Product Recommendations:
If you have an e-commerce chatbot, you can use custom fields to recommend products based on a user’s previous interactions or preferences. Here’s how:
– Store data about the user’s product preferences or purchase history in custom fields e.g., {{favorite_category}} or {{recent_purchase}}
– Based on this data, create automated messages that suggest related or complementary products. For example, if a user recently bought a smartphone, you can send a message like, “We noticed you purchased a smartphone. Check out our latest phone accessories!”
This personalisation not only enhances the user experience but also increases the likelihood of making additional sales.
Note:
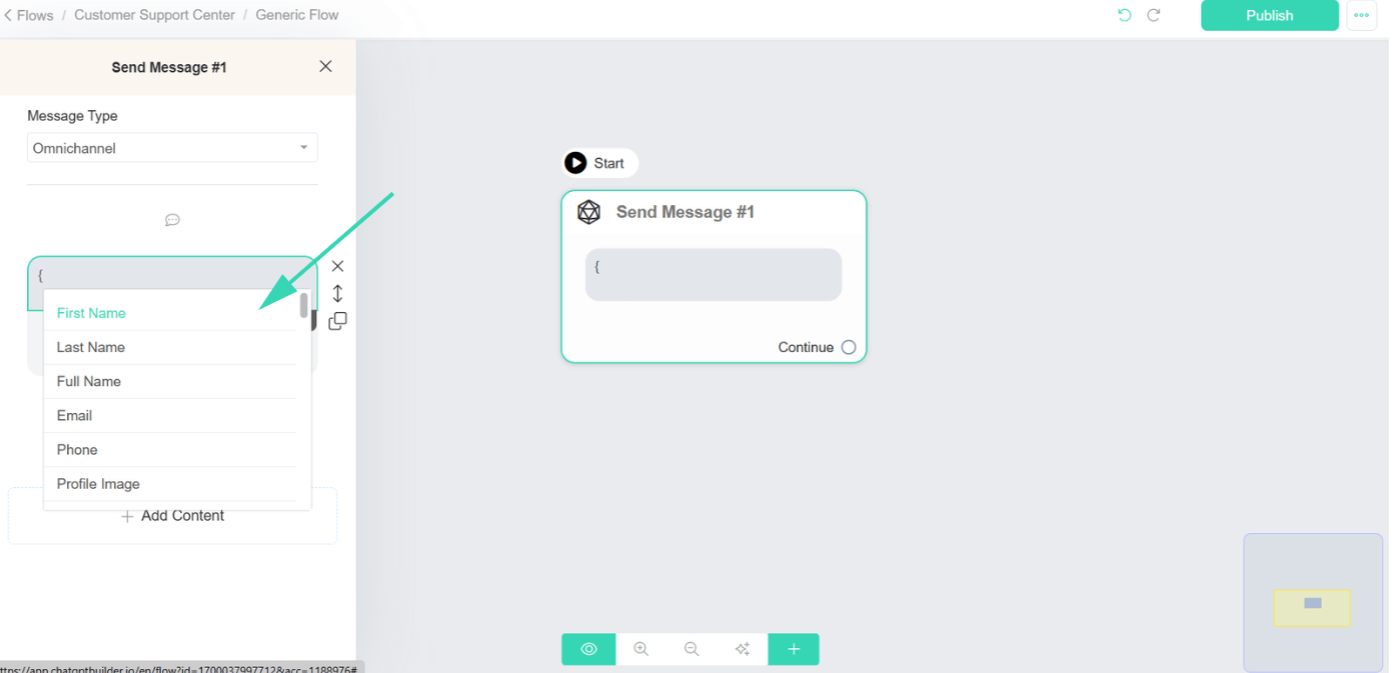
To use custom fields on the chat flow, use curly brackets { } on the text block to set the required custom field for your chat flow.
When you start typing, the curly brackets {{ get you the list of the custom fields you had in the platform.
On that custom field list apart from the default System fields from Business Data, you will find additional custom fields. They are nothing but the custom fields that you created for storing the user details.
System Fields
1. Understanding System Fields
System fields in a chatbot act like pre-built containers that effortlessly collect crucial information about clients, such as their name or email. Unlike custom fields, they don’t require additional setup; they’re like ready-made tools that the chatbot intuitively uses to gather key details from people.
System fields are fields created by Business Data that allow you to access many contact and bot data that are automatically saved by Business Data.
2. Using System Fields
Business Data has many system fields, and not all system fields are visible when you build your bot. If you use a system field on your bot, even if the system field isn’t visible on the list of available fields, it works.
Contacts fields
{{first_name}}
{{last_name}}
{{full_name}}
{{email}}
{{phone}}
{{user_country}}
{{user_state}}
{{user_city}}
{{inbox_link}}: the link to the inbox on Business Data
{{gender}}
{{locale}}: User language. Example en_US
{{locale2}}: User language. Example en
{{username}} : The Instagram user name.
{{profile_pic}}
{{timezone}}
{{user_id}} : the contact user ID on ChatBot Builder. Use this ID on API.
{{subscribed_date}} : the date when the contact was created.
{{fb_chat_link}} : The direct link to a contact’s Facebook Inbox.
{{me}} : Contains a link where a user can see and delete his data. This help business to stay compliant with GDPR.
{{webchat}}
{{user_code}}
{{last_btt_title}}
{{last_interaction}}
{{last_order}}
{{last_seen}}
{{last_text_input}} : the last text message set by the user.
{{last_input}}: the last text, image, video, audio, or file sent by the user.
{{last_input_type}}: text, image, video, audio, file.
{{consecutive_failed_reply}}
{{last_ref}} : the last entry point link clicked by the user.
{{last_ad}} : the last Facebook Ad id that leads the user to your bot.
{{user_channel}}: the primary channel of the user.
{{user_hash}}
{{user_tags}} – contains the name of all tags applied to a contact.
{{user_external_id}} the Viber our Google Business Message user id.
{{user_source}}: Ads, Facebook/IG comment, Direct, Imported, API, Inbound Message, Unknown …
{{assigned_admin_name}}
{{assigned_admin_id}}
{{current_user_time}}
{{chat_history}}: return the last 50 messages between the user and the business.
{{chat_history_large}}: return the last 200 messages between the user and the business.
{{chat_history_details}}: like {{chat_history}} but it includes WHO sent the message.
{{chat_history_details_large}}: like {{chat_history_details}} but it includes WHO sent the message.
Account fields
{{page_address}}
{{account_id}}
{{account_name}}
{{page_user_name}}
{{api_key}}: the API key of your account
{{last_call_recorded}}
Facebook/Instagram Auto Comment fields
{{total_new_tagged}} : Number of users that aren’t in your contact list that were tagged in the comment. works only on Facebook
{{total_tagged}} : Number of users that aren’t tagged in the comment. Works only on – Facebook.
{{last_fb_comment}}: the text of the last comment of a user.
{{last_post_id}} : the post ID of the last post commented by the user.
Instagram Story Reply fields
{{last_story_id}}
Location
{{last_latitude}} : only available if the user shared his location before.
{{last_longitude}} : only available if the user shared his location before.
Booking fields
{{booking_date}}
{{booking_link}}
{{booking_id}}
{{booking_calendar}}
E-commerce fields
{{cart_checkout_link}}
{{cart_last_item_name}}
{{cart_last_item_quantity}}
{{cart_num_items}}
{{cart_other_fees}}
{{cart_shipping_cost}}
{{cart_subtotal}}
{{cart_total}}
{{shop_link}}
{{money_symbol}}
{{order_coupon_code}}
{{order_coupon_discount}}
{{order_date_account_timezone}}
{{order_date_timestamp}}
{{order_date_utc}}
{{order_discount}}
{{order_email}}
{{order_id}}
{{order_name}}
{{order_payment_method}}
{{order_phone}}
{{order_products}}
{{order_shipping_type}}
{{order_shipping_address1}}
{{order_shipping_address2}}
{{order_shipping_city}}
{{order_shipping_cost}}
{{order_shipping_state}}
{{order_shipping_zip}}
{{order_shipping_country}}
{{order_shipping}}
{{order_status}}
{{order_subtotal}}
{{order_taxes}}
{{order_total}}
{{product_name}}: use it with the Trigger “Product Ordered” or “Product added to cart”.
{{product_quantity}}: use it with the Trigger “Product Ordered” or “Product added to cart”.
{{product_id}}: Use it with the Trigger “User Asked About a Product”, “Product Ordered”, “Product added to cart” or “Product removed from cart”.
3. The System Field isn’t visible; how to use it?
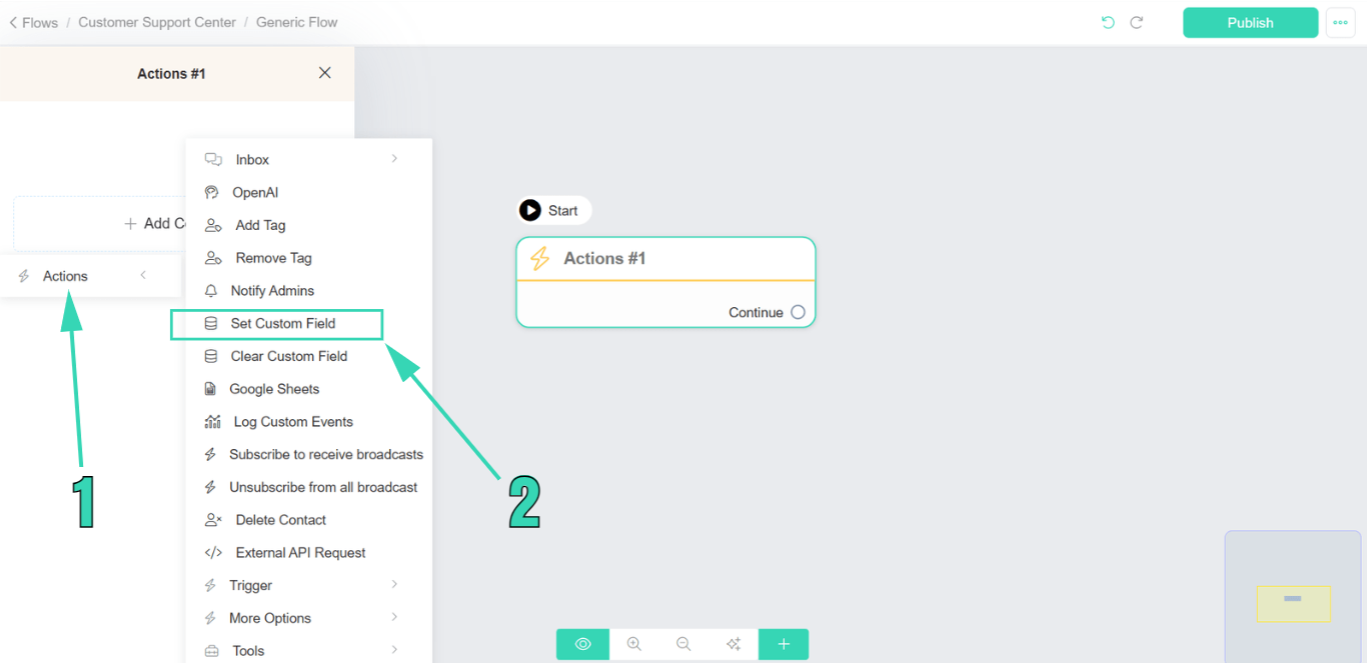
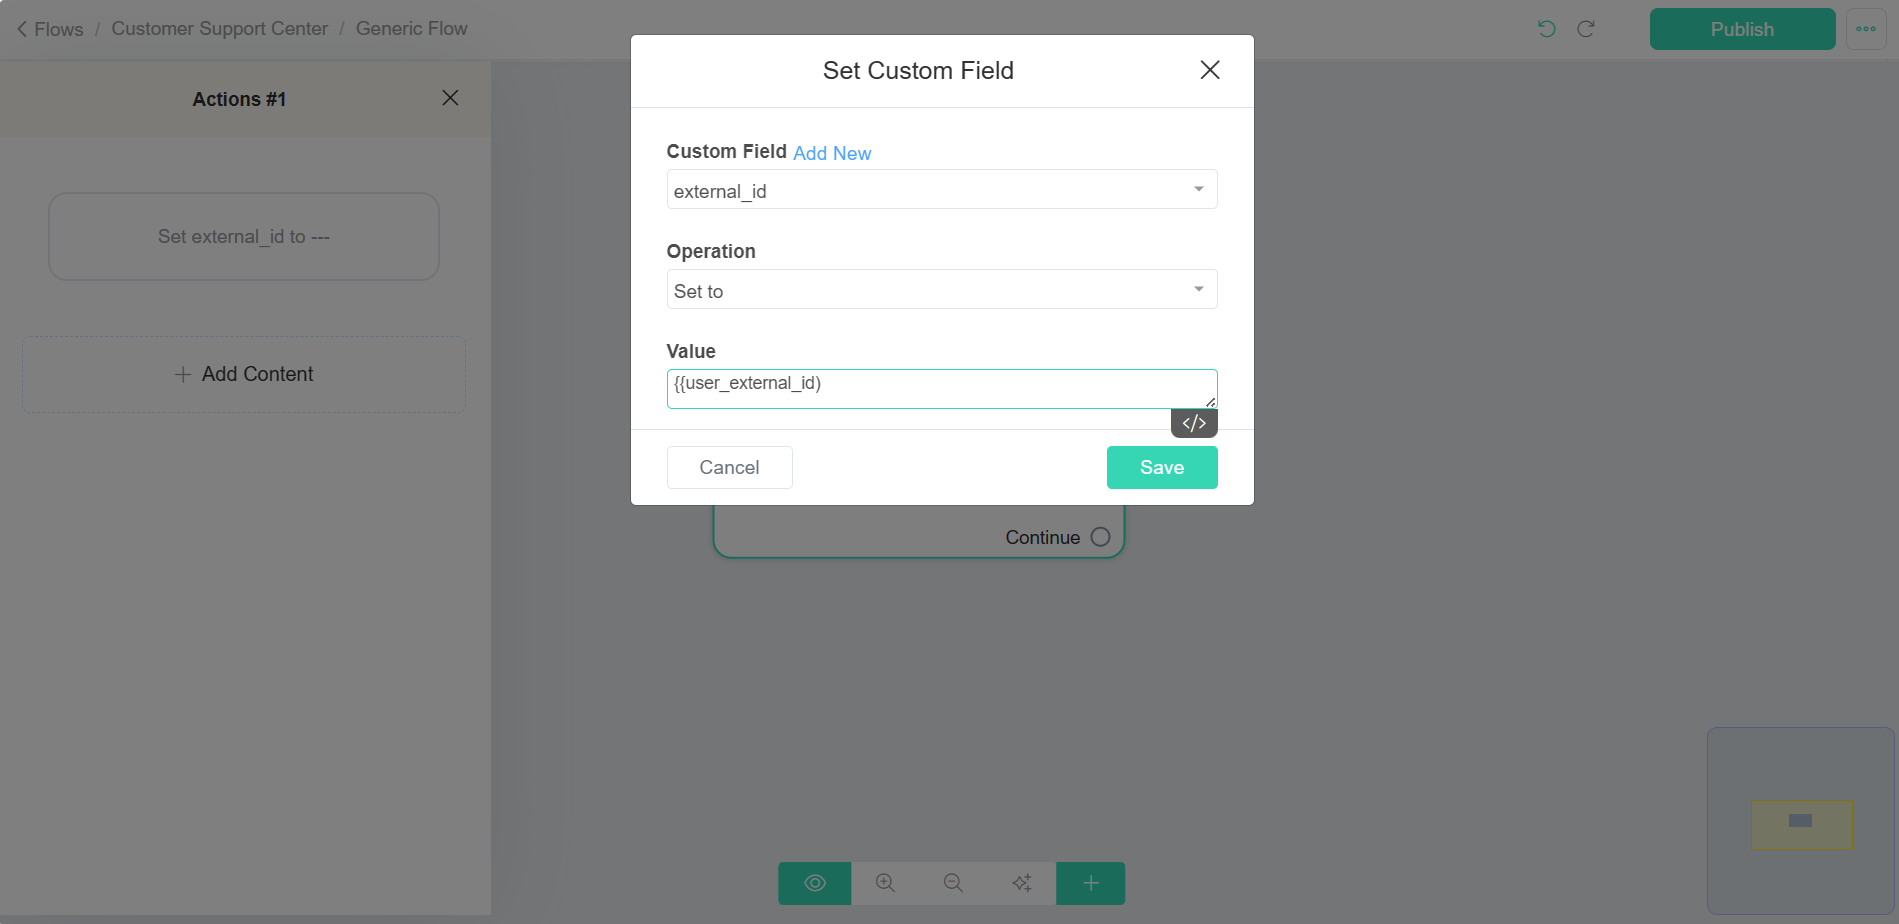
You will not see suggestions for all these above fields on the flow builder. If you want to send the data to Google Sheets or any similar built-in integration and you don’t see the system field on the list, you can create a Custom field and transfer the System field value to your Custom field using the action “Set Custom Field “.
4. Practical Use cases
Incorporate system fields into your chatbot messages. Here is a practical example:
a. Email Subscription Confirmation:
You can use system fields to capture a user’s email address and confirm their subscription:
Chatbot message: “Thanks for chatting with us, {{first_name}}! Would you like to subscribe to our newsletter? We already have your email address as {{email}}, is that correct?”
This approach simplifies the subscription process by using the email address already associated with the user’s messaging platform account.
User Input
1. Understanding User Input
User inputs are the messages, responses, or data that users provide when interacting with a chatbot or any automated system. These inputs can come in various forms, such as text messages, voice commands, button clicks, form submissions, and more. User inputs serve as the means through which users convey their questions, requests, preferences, and information to the chatbot.
Gathering and utilising user input is vital for chatbot interactions as it facilitates personalisation, contextual understanding, efficient problem-solving, and enhances overall user experiences. This capability empowers chatbots to be more responsive and valuable tools for both businesses and users.
2. Setting Up User Input Prompts
This is a critical part of creating effective chatbot interactions. Here are three key steps to follow:
a. Define User Input Prompts for Specific Information:
Start by precisely outlining the information you require from users in the conversation. Identify the crucial data or responses necessary to accomplish the chatbot’s objectives.
For example:
If you’re building a travel booking chatbot, you might need information like the destination, travel dates, and budget.
If you’re building a chatbot for a restaurant, you might want to ask for the user’s name, preferred dining date, and dietary preferences.
These questions serve as prompts to gather specific details from the user.
b. Customise Prompts to Encourage User Responses:
Craft prompts that are clear, concise, and user-friendly. Consider the following tips:
– Be polite and friendly in your requests. Use phrases like “Please” or “Could you kindly” to encourage cooperation.
– Use natural language to make the prompts sound less robotic and more conversational.
– Break down complex questions into simpler, sequential prompts to avoid overwhelming your clients.
– Incorporate visual elements like buttons or quick replies to make responding easier.
– Be context-aware. Use previous user responses or system fields (e.g., {{first_name}}) to personalize prompts.
For example: If you need the user’s destination, you could use a prompt like: “Hi {{first_name}}, where would you like to travel to? You can type or select from the options below.”
c. Configure Validation Rules if Necessary:
Depending on the nature of the information you’re collecting, you may need to set up validation rules to ensure the data collected is accurate and in the expected format, and at the allowed period of collection.
For instance:
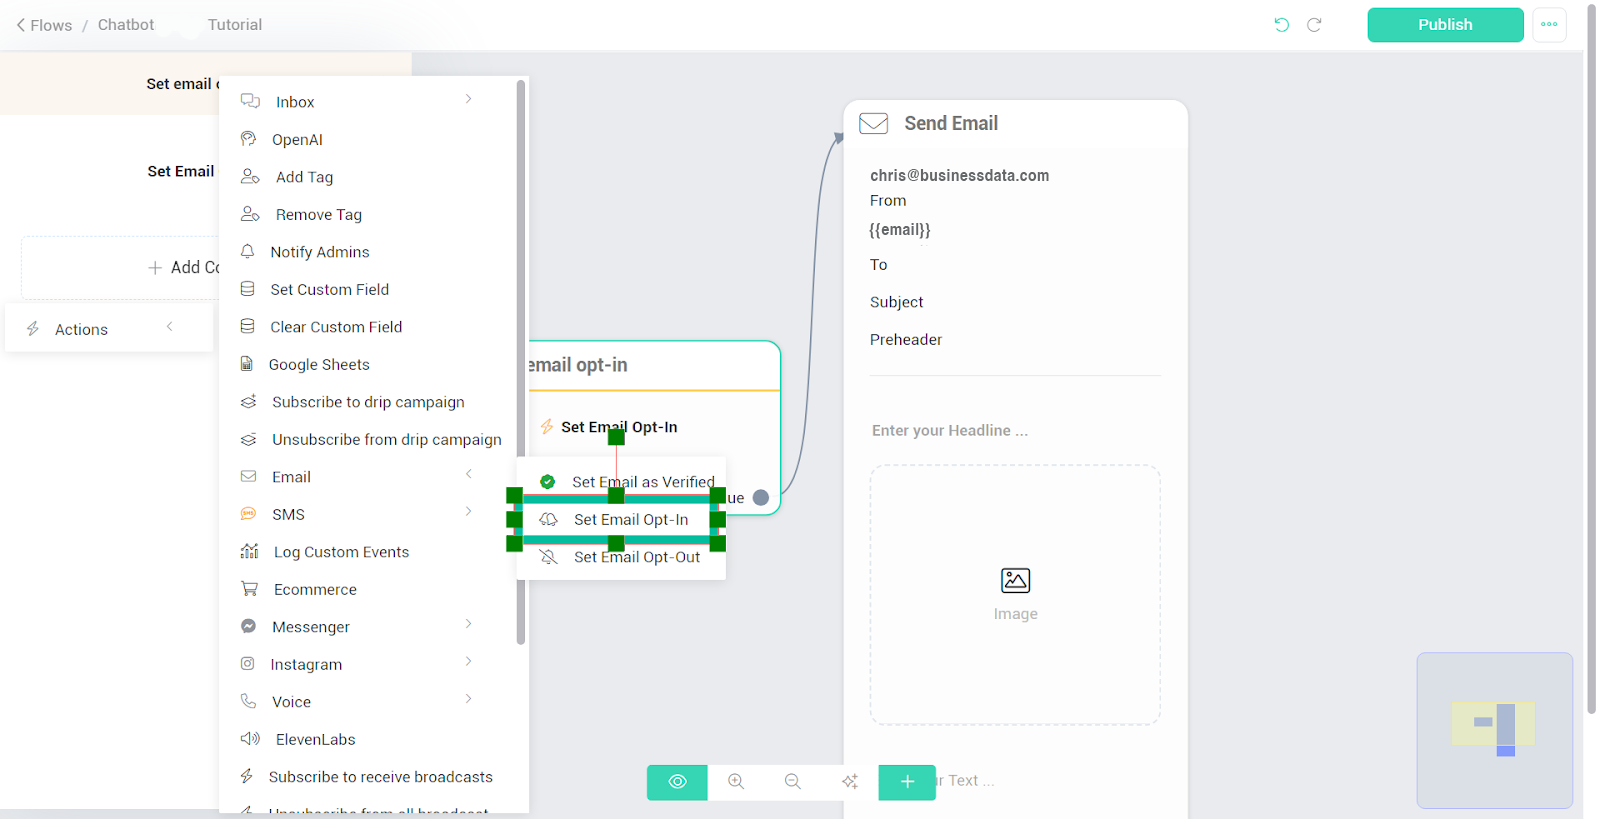
– If collecting email addresses, use validation to check for the presence of “@” and a valid domain. You should also ensure that your client has opted in to receive emails before you send out an email, otherwise, you will receive an error message.
– For dates, validate that they are in a valid date format and that the dates are within a reasonable range.
– Ensure your chatbot handles unexpected or incorrect responses gracefully. For instance, if a user inputs an invalid date, offer a friendly error message and prompt them to try again.
Using validation rules ensures data accuracy, minimises confusion, and fosters smoother and more successful interactions with users.
3. Integrating Custom and System Fields
- When you collect information from users, store it in custom fields.
- Use that information along with system fields to create personalised messages and provide better help.
- If you need to remember a user’s choice or details for later, custom fields are your go-to tool.
- System fields are always ready to understand and greet users with their name or in their preferred language.
Back to Documentation Home